# On Course Practice
## **On Course Practice:**
On Course Practice offers a wide variety of tools to improve your golf game on any courses offered to GSPro. Down below is a guide going over each tool unique to On Course Practice and how to utilize them.
### Where do I find On Course Practice:
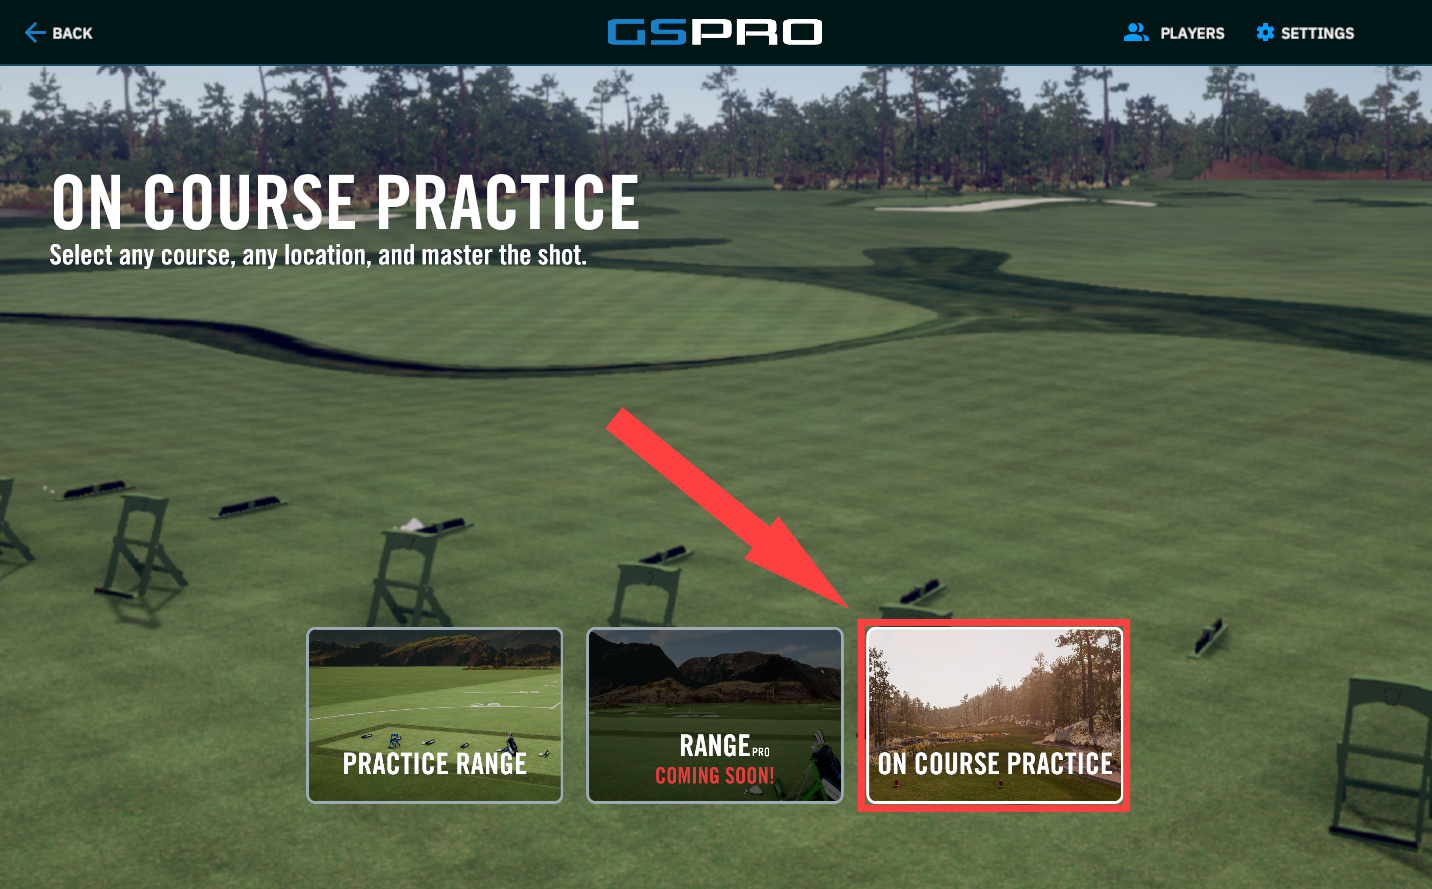
On the main menu of GSPro, click the “Practice” menu. From the next options, you'll select “On Course Practice”. Once you select On Course Practice, you will be shown a list of courses to play/download. If this is your first time searching for courses to download, please reference [Local Match - setup](/gspro-knowledge-base/local-match-main-menu/local-match-setup.md).
### **On Course Practice tool bar:**
Once you’ve loaded onto your selected course, you will be shown the UI as seen below.
### **Moving around the course:**
If you’ve taken any shots already, you’ve found that you do not continue your shot from the position you’ve just landed by default. This is because On Course Practice is created to take shots from the same position over again until you are ready to move on. Below is the first tool in the top left toolbar that will let you move the ball to any position on a hole you'd like.
Click the ball in the top left toolbar. (You’ll know you’ve correctly selected the icon when your mouse icon changes to the ball icon) Now that your mouse has changed to the ball icon, you can place your ball in a new location. Click anywhere on screen in front of you, or anywhere on the mini map you’d wish to move to.
{% hint style="info" %}
***Tip:*** Utilize the keyboard shortcut keys **Q**,**W** to zoom in/out on the mini map and see more of the course when selecting your exact position to move to. You can also press the shortcut key "**8**" to play from the next lie position.
{% endhint %}
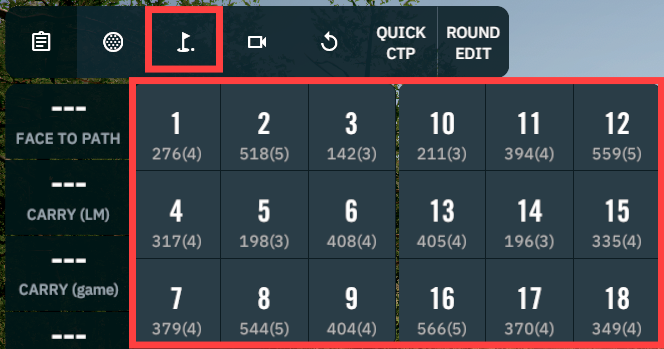
Now that you’ve played endless positions on the first hole of your course, you probably want to move to a new hole. In the same toolbar the ball icon is found in, there is also a flag. Click this flag icon to open a menu of all the selected holes on that course. (The amount of holes shown may vary based on the course itself, and holes selected in the Match Settings “Holes” tab before the match was started)
In this new window you will select any desired hole you’d wish to move to. You may also use the keyboard shortcut keys 9, (Previous Hole) and 0 (Next Hole) to transition between holes.
### **Replays and Camera Settings:**
In the same toolbar are some fun Camera Settings and Replay options allowing you to show your friends your hole in one line from multiple angles. To replay your latest shot, click on the “rewind” icon. Your latest shot will replay.
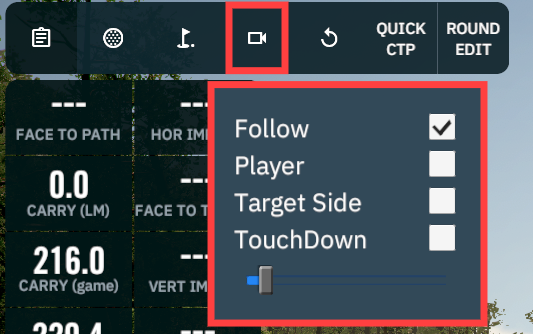
The replay of the shot you’ve just taken may not offer the cinematic look you were looking for. Click on the Camera Icon in the toolbar. (A new dropdown menu of options will show)
As seen above, you have the options Follow, Player, Target Side, and Touchdown. These four options dictate where your camera will be positioned when the ball is launched in your replay. (The end of these options includes a slider. This slider changes the delay for how fast the camera will leave the player to follow the ball)
* Follow: This will have the camera actively follow the ball when shot.
* Player: The camera will now stay with the player when shot.
* Target Side: The camera will be placed where you have ranged/targeted on the mini map, or screen.
* TouchDown: The camera will be placed near where the ball will touchdown after flight.
### **Data Table/Export CSV:**
At this point, you have most likely taken quite a few shots. Just like the Practice Range, you can see and export the data produced from those shots to your desktop. To view your shots taken so far and the data produced with them, click on the clipboard icon found in the toolbar.
A new window will appear showing all of your shots taken so far in order. Adjacent to each shot is the club used, and the data created from the shot. The bottom of this data table is an average calculation created from each shot put into the table. If you don’t like a certain shot or one was taken by mistake, you can delete any specific shot by clicking on the “trashcan” icon adjacent to it. Not all of the data produced from any shot can be displayed on this page. To see all of the data produced on the data table, click “Export CSV”. This will send a copy of the data table with all of the produced data to your desktop.
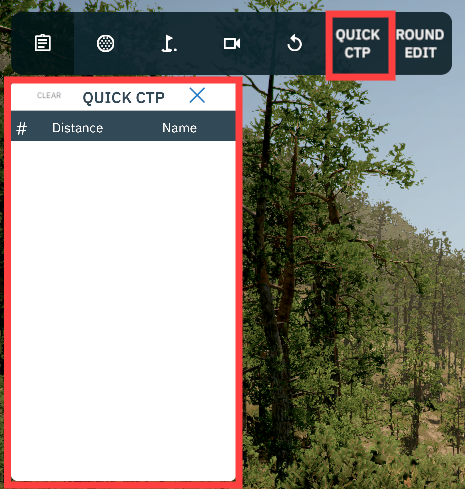
### **Quick CTP:**
Like the Practice Range, On Course Practice offers the skill game Closest to The Pin. (Quick CTP) Use the information previous in this document to place your ball in a location you’d wish to start your Closest to The Pin session from.
Once you’ve found the right hole/location, click “Quick CTP” in the top left toolbar. A new window will appear letting you know the Closest to The Pin session has started.
With the game mode started, each shot that lands in the green will be displayed on this window. (The shots will be ranked based on distance from the pin)
If you are playing this game with another player locally, you may want to attach names to the scores. No names will be attached to these scores by default, and will need to be manually added. To add names, click on the two dashes adjacent to the desired score. A new window will show allowing you to add a player name into a box. Once the name is added, click the checkmark to confirm the name. If you’d like to clear the scoreboard without closing the Quick CTP, you can utilize the “Clear” option in the top left corner of the Quick CTP window.
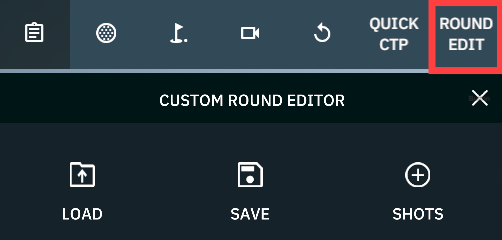
### **Round Edit:**
Other than improving your golf game, On Course Practice will be utilized for creating [Custom Skills Tests](/gspro-knowledge-base/challenges-main-menu/custom-skills-test.md). To start creating your own Custom Skills Test, first click “Round Edit” in the top left tool bar. (The Custom Round Editor window will appear)
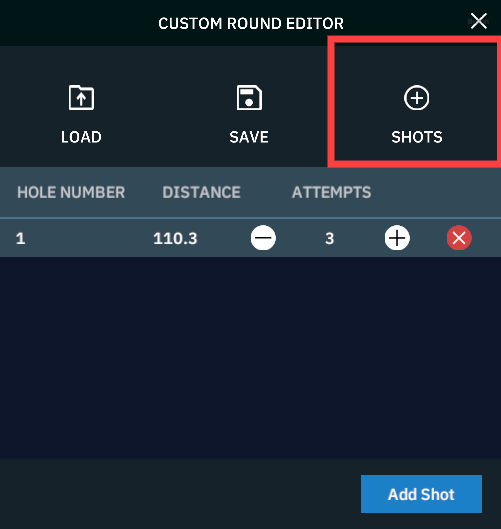
To start, click on the “Shots” tab. A new window will show. Using the knowledge from the guide so far, move to your desired hole/position for your shots. Once you have a perfect position for that hole, click “Add Shot” to add it to your custom round. Once added, you’ll be shown the hole number, (what place that shot takes in your custom round) the distance that shot is from the pin, and how many attempts the user will have at that shot position. (Click the -,+ to add, or take away shot attempts)
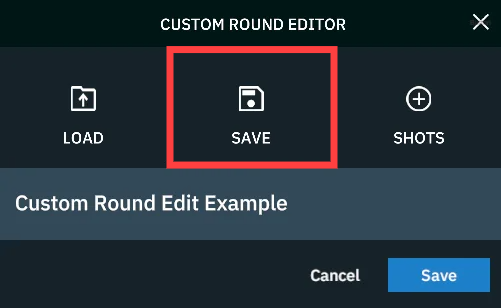
Once you have all the shots you’d like, click on the “Save” tab. Here you will edit the name of your custom game, and click “save” to save it. To find your now created Skills Test, exit the On Course Practice, and head to “Custom Skills Test”.
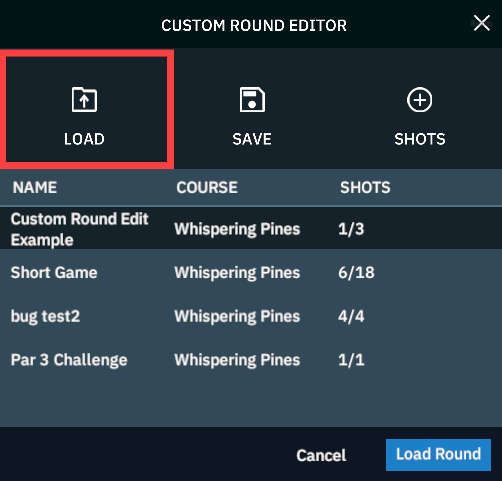
If you already have a Custom Round built for that course, you can load it in to change/add shots to it through the “Load” tab. (In order to load a preexisting Custom Round in, you must be on that desired course) Once loaded, head to the “Shots” tab to change as needed, and to the “Save” tab to save the new changes.
---
# Agent Instructions: Querying This Documentation
If you need additional information that is not directly available in this page, you can query the documentation dynamically by asking a question.
Perform an HTTP GET request on the current page URL with the `ask` query parameter:
```
GET https://gspro.gitbook.io/gspro-knowledge-base/practice-main-menu/on-course-practice.md?ask=
```
The question should be specific, self-contained, and written in natural language.
The response will contain a direct answer to the question and relevant excerpts and sources from the documentation.
Use this mechanism when the answer is not explicitly present in the current page, you need clarification or additional context, or you want to retrieve related documentation sections.
.png)


.png)
.png)